Setup and Configuration
This section outlines the various flags available for customizing the use of this repository and provides guidance on starting the video-streamer to suit your specific needs.
Flags and Parameters
Below is a list of all flags and parameters that can be set to customize the usage of the repository:
usage: video-streamer [-h] [-c CONFIG_FILE_PATH] [-uri URI] [-hs HOST]
                      [-p PORT] [-q QUALITY] [-s SIZE] [-of OUTPUT_FORMAT]
                      [-id HASH] [-d] [-r] [-rhs REDIS_HOST] [-rp REDIS_PORT]
                      [-rk REDIS_CHANNEL] [-irc IN_REDIS_CHANNEL]

mxcube video streamer

options:
  -h, --help                                show this help message and exit
  -c CONFIG_FILE_PATH, --config             CONFIG_FILE_PATH
                                            Configuration file path
  -uri URI, --uri URI                       Tango device URI
  -hs HOST, --host HOST                     Host name to listen on for incomming client
                                            connections default (0.0.0.0)
  -p PORT, --port PORT                      Port
  -q QUALITY, --quality                     QUALITY
                                            Compression rate/quality
  -s SIZE, --size SIZE                      size
  -vf, --vflip                              Flip video vertically, default False
  -of OUTPUT_FORMAT, --output-format        OUTPUT_FORMAT
                                            output format, MPEG1 or MJPEG
  -id HASH, --id HASH                       Stream id
  -d, --debug                               Debug true or false
  -r, --redis                               Use redis-server
  -rhs REDIS_HOST, --redis-host             REDIS_HOST
                                            Host name of redis server to send to
  -rp REDIS_PORT, --redis-port              REDIS_PORT
                                            Port of redis server
  -rk REDIS_CHANNEL, --redis-channel        REDIS_CHANNEL
                                            Key for saving to redis database
  -irc IN_REDIS_CHANNEL, --in_redis_channel IN_REDIS_CHANNEL
                                            Channel for RedisCamera to listen to
Running the Application
To run the application you need a camera device (can be a redis server as well) to poll images from and create either an MPEG1 or MJPEG stream. The different supported camera types and how to use them are explained in more details in the Cameras section. To explain how the setup could look like, we will use the example of the TestCamera, which does not use a physical device, but instead is used to create a stream showing the same image over and over.
Running the Streamer from the Command Line
To use the camera for testing, simply run
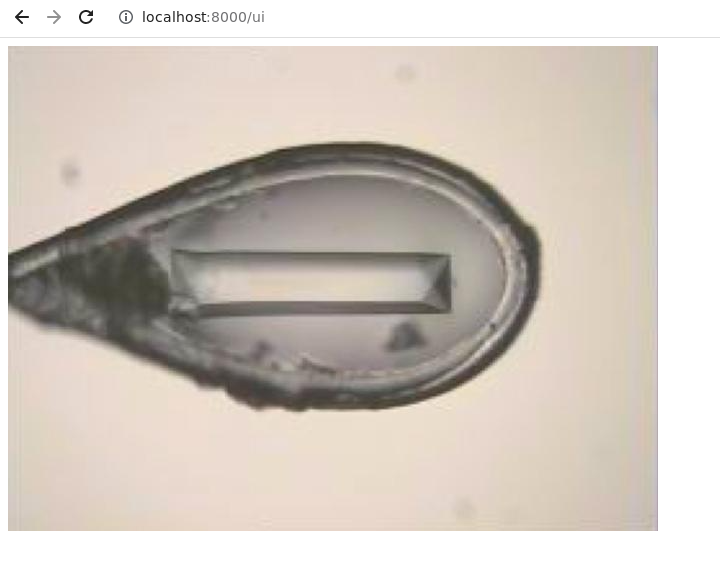
video-streamer -d -of MPEG1 -uri test
There is a default test/demo UI to see the video stream on http://localhost:[port]/ui (per default the port is set to 8000). For the TestCamera you should see the following image
Running the Streamer from the configuration file
There is the possibility to use a configuration file instead of command line arguments. All command line arguments except debug are ignored if a config file is used. The configuration file also makes it possible to configure several sources while the command line only allows configuration of a single source.
The configuration file format is JSON. A test image is used when the input_uri is set to test (Same as -uri flag). The example below creates one MPEG1 stream (on port 8000) and one MJPEG stream (on port 8001) from the test image.
Run:
video-streamer -c config.json
with config.json looking like this:
{
    "sources": {
        "0.0.0.0:8000": {
            "input_uri": "test",
            "quality": 4,
            "format": "MPEG1"
        },
        "0.0.0.0:8001": {
            "input_uri": "test",
            "quality": 4,
            "format": "MJPEG"
        }
    }
}
Dual Streaming: Seamlessly Serve MJPEG and Redis Pub/Sub Video Feeds
When generating an MJPEG stream using any of the cameras (except for MJPEGCamera) implemented in video-streamer, it is possible to use a Redis Pub/Sub channel as additional Video feed.
Below you can see an example on how to do that from the command line:
video-streamer -d -of MPEG1 -uri test -r -rhs localhost -rp 6379 -rk video_streamer
where -r flag is needed to allow the stream to redis , -rhs,-rp, -rk define the host, port and channel of the targeted Redis Pub/Sub respectively.
The format of the frames send to Redis looks as follows:
frame_dict = {
    "data": [encoded image data],
    "size": [image size],
    "time": [timestamp of image_polling],
    "frame_number": [number of frame send to Redis starting at 0],
}
, where the encoded image data represents a base64 encoded raw image, for more information please refer to the RedisCamera, which uses the same encoding.